
Darning socks is an age-old technique that allows you to repair holes and extend the life of your favorite pairs. Instead of discarding worn-out socks, learning to darn them can help you save money and contribute to a more sustainable lifestyle. This comprehensive guide will take you through the art of darning socks, step by step, ensuring you master the skill effortlessly.
Why Darn Your Socks?
Darning socks may seem like an old-fashioned skill, but it comes with many benefits:
Sustainability – Instead of throwing away socks with minor damage, repairing them reduces waste and minimizes the environmental impact of textile disposal.
Cost-Effective – Constantly replacing socks can add up financially. Darning helps you save money by prolonging the life of your socks.
Preserving Comfort – Your well-worn socks are already molded to your feet, making them more comfortable than brand-new ones.
Aesthetic and Creativity – You can use different thread colors and patterns to add a personal touch to your socks.
Sentimental Value – Some socks may hold sentimental value, especially if they were gifted or have a unique design. Darning helps preserve them.
Skill Development – Learning to darn can be a valuable life skill, teaching patience, precision, and sustainability.
Essential Tools for Darning Socks
Before you start, gather the following tools:
Darning Needle – A needle with a large eye that works well with thicker threads.
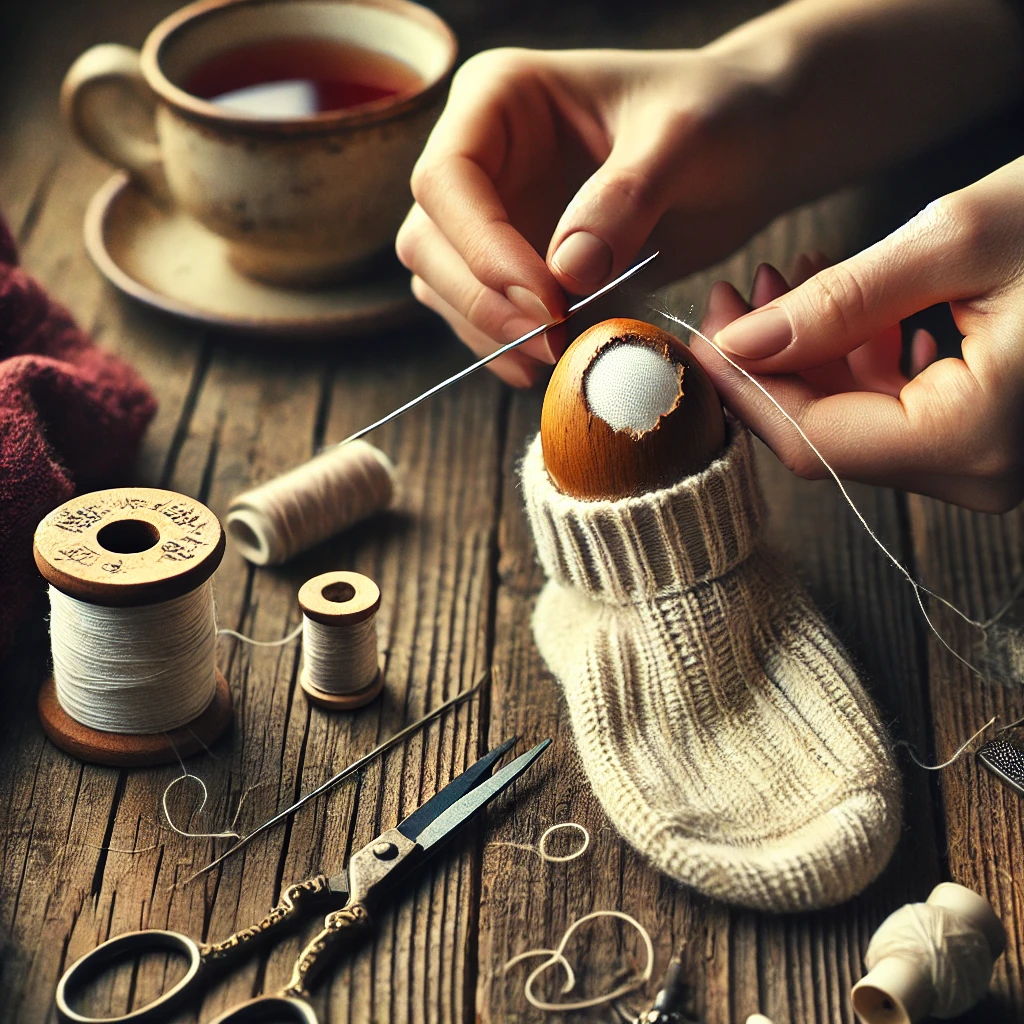
Darning Egg or Mushroom – A rounded object to provide a firm surface for stitching. You can substitute this with a tennis ball, a small bowl, or even a lightbulb.
Thread or Yarn—Use wool or cotton thread, preferably matching the sock’s material and thickness. If you prefer a decorative touch, use a contrasting color.
Scissors – For trimming excess thread.
Sock to Repair – A clean, dry sock with a hole or thinning area.
Thimble (Optional) – Helps protect your fingers when pushing the needle through thick fabric.
Step-by-Step Guide to Darning Socks
Step 1: Prepare the Sock
Turn the sock inside out and place the darning egg under the hole. This will provide support and make stitching easier. A tightly rolled-up sock or a tiny jar can substitute if you don’t have a darning egg.
Step 2: Thread the Needle
Cut a piece about 18 inches long and thread it through the needle. Tie a small knot at the end to prevent it from slipping. If using yarn, ensure it is not too thick for the fabric to avoid unnecessary bulk.
Step 3: Outline the Hole
Using a simple running stitch, sew around the hole’s edges. This helps prevent further fraying and secures the repair area. Be sure to keep your stitches even and secure.
Step 4: Create Vertical Threads (Warp Threads)
Pass the needle over the hole, making parallel stitches that run vertically from one side to the other. Ensure these threads extend slightly beyond the hole’s edges for better durability. Keep the tension balanced—too tight, and the fabric will pucker; too loose, and the repair may not hold.
Step 5: Weave Horizontal Threads (Weft Threads)
Start weaving the thread through the vertical stitches in an over-and-under pattern, like traditional weaving. Keep the tension even to ensure a smooth, reinforced fabric. Double up the threads for added strength if working with a larger hole.
Step 6: Secure the Stitching
Once the hole is fully covered, tie off the thread with a small knot and weave the tail into the sock’s fabric. Trim any excess thread. Lightly press the darned area with an iron on low heat to smooth any bumps.
Alternative Darning Methods
Swiss Darning (Duplicate Stitching)
This method reinforces thin fabric before it develops a hole. Instead of weaving new fabric, you mimic the existing knit pattern by overlaying stitches. This almost invisible repair blends seamlessly with the sock’s original texture.
Knitted Patch
If the hole is too large, you can knit a small patch separately and sew it onto the sock. This technique is beneficial for heavy woolen socks that require additional durability.
Speed Darning (Zig-Zag Stitch on a Machine)
If you have a sewing machine with a zig-zag stitch function, you can use it for a quick repair. Simply set the machine to a tight zig-zag pattern and carefully stitch over the worn-out area.
Caring for Darned Socks
Hand Wash Recommended – Use a mild detergent and lukewarm water to prevent stress on the repaired area.
Air Dry – Avoid using a tumble dryer, which may weaken the repair stitches and shrink the sock.
Regular Inspections – Check for thinning areas and reinforce them before holes appear. Preventive darning can save time and effort in the long run.
Store Properly – Keep your socks dry to prevent excess wear and tear. Folding socks neatly instead of rolling them into tight balls can also help maintain their shape and longevity.
Conclusion
Darning socks is a valuable skill that promotes sustainability, saves money, and allows for creative expression. You can efficiently repair your socks and even transform them into unique fashion statements with practice.
Whether you’re extending the life of a beloved pair or simply experimenting with a new craft, darning is a rewarding and valuable technique that anyone can learn.
Check out this UK and India Shoe Size Conversion Guide for a helpful resource on shoe size conversions. Happy darning!